Capturing clear audio isn’t always as simple as hitting “record.” Whether you’re a journalist trying to get a quote in a bustling crowd, a content creator aiming for immersive field sounds, or a hobbyist documenting nature, recording in noisy or unpredictable environments presents unique challenges. This guide focuses on practical strategies and equipment choices to achieve usable audio when perfect conditions are a luxury, not a given.
Understanding the Foe: Environmental Noise
Environmental noise is any unwanted sound interfering with your desired audio. It can be constant, like traffic hum or air conditioning, or intermittent, like sudden conversations, slamming doors, or passing vehicles. The key to effective recording in these situations is to minimize the amount of unwanted sound that reaches your microphone and to capture your subject’s audio as cleanly as possible. This isn’t just about volume; it’s about clarity and intelligibility. Ignoring these factors leads to recordings that are muddy, distracting, and often unusable, requiring extensive (and sometimes impossible) post-production cleanup.
Before you even press record, take a moment to “listen” to your environment. Identify the types of noise present. Is it low-frequency rumble, mid-range chatter, or high-pitched whines? This assessment helps inform your equipment choices and recording techniques. For instance, a microphone excellent for a quiet studio might be a liability in a noisy street, picking up everything indiscriminately.
Strategic Microphone Selection and Placement
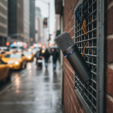
The microphone is your primary tool, and selecting the right type, along with careful placement, is crucial. For challenging environments, directional microphones are often your best friend. These microphones are designed to pick up sound predominantly from a specific direction, rejecting sounds from the sides and rear. Popular types include:
- **Shotgun Microphones:** Excellent for isolating sound directly in front of them, even at a distance. They are often used for film and video production to capture dialogue from actors without picking up the camera crew or surrounding noise.
- **Cardioid/Hypercardioid Microphones:** These have a heart-shaped pickup pattern, focusing on sounds directly in front while reducing sounds from the sides and rear. They are versatile for interviews or individual voices.
Beyond microphone type, placement is paramount. Get the microphone as close to your sound source as physically and aesthetically possible. Every inch closer to your subject translates to a significant reduction in the relative volume of background noise. If using a lavalier (lapel) microphone, ensure it’s properly clipped and not rubbing against clothing. For handheld or camera-mounted microphones, direct it precisely at your subject. Using a “dead cat” or foam windscreen is essential outdoors or in windy conditions, as wind noise can completely ruin a recording, sounding like harsh static.
Utilizing On-Device Features and Accessories
Many modern audio recorders and even some smartphones offer features that can significantly improve your results in noisy environments. Look for:
- **Low-Cut Filters (High-Pass Filters):** These reduce low-frequency rumbling sounds like traffic, HVAC systems, or wind. Activating this feature *before* recording is almost always beneficial in uncontrolled environments.
- **Limiters/Compressors:** While best used subtly, a limiter can prevent sudden loud noises from “clipping” or distorting your audio. A compressor can help even out volume differences, making dialogue more consistent.
- **External Recorders:** For serious work, dedicated portable audio recorders (like those from Zoom or Tascam) offer superior preamps, better battery life, and more advanced features than typical smartphone recording apps. They also allow you to connect professional microphones.
- **Headphones:** Always monitor your audio with quality headphones while recording. This is the only way to immediately detect unwanted noise, distortion, or microphone issues. Don’t rely solely on visual meters.
Regarding privacy and ethics, always inform individuals you are recording, especially when capturing conversations or interviews. In many jurisdictions, recording without consent can have legal ramifications. Even where legal, it’s generally considered ethical to be transparent. For public environments, while passive recording might be permissible, actively focusing on and capturing specific individuals without their knowledge can raise privacy concerns. Be mindful and considerate.
Post-Production: Cleaning Up and Enhancing
Despite your best efforts, some unwanted noise might inevitably seep into your recordings. Modern audio editing software (Audacity, Adobe Audition, DaVinci Resolve’s Fairlight, etc.) offers powerful tools for noise reduction. However, remember that “fixing it in post” is always less ideal than getting it right at the source. Extensive noise reduction can make audio sound unnatural or “processed.”
Common post-production techniques include:
- **Noise Reduction:** Many software tools can “learn” the unique frequency profile of a background hum or steady noise and then reduce it across the entire track.
- **EQ (Equalization):** You can use EQ to selectively boost or cut specific frequencies to enhance clarity or reduce unpleasant tones.
- **Compression:** Further fine-tune dynamic range to make voices more consistent and sit better in a mix.
Ultimately, achieving clean audio in challenging environments is a blend of preparation, informed equipment choices, skillful technique, and a touch of post-production finesse. By focusing on minimizing unwanted sounds at the source, you dramatically improve the quality and utility of your recordings, transforming previously unusable audio into clear, impactful sound.